Spot tracker info

Hey everyone! You can find a link to our SPOT tracker below:


Also check out the Watertribe challenge mapper at:

Friday, September 30, 2011

Check-in/OK message from Redbeard SPOT Messenger

Redbeard
Latitude:34.86663
Longitude:-76.76303
GPS location Date/Time:09/30/2011 20:46:50 MDT

Message:We are OK.

Click the link below to see where I am located.
http://fms.ws/66ns5/34.86663N/76.76303W

If the above link does not work, try this link:
http://maps.google.com/maps?f=q&hl=en&geocode=&q=34.86663,-76.76303&ll=34.86663,-76.76303&ie=UTF8&z=12&om=1

Redbeard

You have received this message because Redbeard has added you to their SPOT contact list.

Every day is an Adventure. Share Yours.
http://www.findmespot.com

Check-in/OK message from Redbeard SPOT Messenger

Redbeard
Latitude:34.91711
Longitude:-76.7579
GPS location Date/Time:09/30/2011 17:55:09 MDT

Message:We are OK.

Click the link below to see where I am located.
http://fms.ws/66k7H/34.91711N/76.7579W

If the above link does not work, try this link:
http://maps.google.com/maps?f=q&hl=en&geocode=&q=34.91711,-76.7579&ll=34.91711,-76.7579&ie=UTF8&z=12&om=1

Redbeard

You have received this message because Redbeard has added you to their SPOT contact list.

Every day is an Adventure. Share Yours.
http://www.findmespot.com

Check-in/OK message from Redbeard SPOT Messenger

Redbeard
Latitude:35.10005
Longitude:-76.4852
GPS location Date/Time:09/30/2011 08:38:36 MDT

Message:We are OK.

Click the link below to see where I am located.
http://fms.ws/66PRr/35.10005N/76.4852W

If the above link does not work, try this link:
http://maps.google.com/maps?f=q&hl=en&geocode=&q=35.10005,-76.4852&ll=35.10005,-76.4852&ie=UTF8&z=12&om=1

Redbeard

You have received this message because Redbeard has added you to their SPOT contact list.

Every day is an Adventure. Share Yours.
http://www.findmespot.com

Check-in/OK message from Redbeard SPOT Messenger

Redbeard
Latitude:35.01617
Longitude:-76.31635
GPS location Date/Time:09/30/2011 04:57:10 MDT

Message:We are OK.

Click the link below to see where I am located.
http://fms.ws/66KoH/35.01617N/76.31635W

If the above link does not work, try this link:
http://maps.google.com/maps?f=q&hl=en&geocode=&q=35.01617,-76.31635&ll=35.01617,-76.31635&ie=UTF8&z=12&om=1

Redbeard

You have received this message because Redbeard has added you to their SPOT contact list.

Every day is an Adventure. Share Yours.
http://www.findmespot.com

Thursday, September 29, 2011

On the beach and ready to go!

Just one long mosquito filled night to go. Race tracking will go live
around 7am tomorrow morning...

Check-in/OK message from Redbeard SPOT Messenger

Redbeard
Latitude:35.01818
Longitude:-76.3125
GPS location Date/Time:09/29/2011 17:18:18 MDT

Message:We are OK.

Click the link below to see where I am located.
http://fms.ws/66A0z/35.01818N/76.3125W

If the above link does not work, try this link:
http://maps.google.com/maps?f=q&hl=en&geocode=&q=35.01818,-76.3125&ll=35.01818,-76.3125&ie=UTF8&z=12&om=1

Redbeard

You have received this message because Redbeard has added you to their SPOT contact list.

Every day is an Adventure. Share Yours.
http://www.findmespot.com

Wednesday, September 28, 2011

New Paint Scheme

With just a few days to go before the race, most of the 'big' items had been knocked out, so there wasn't much left to do except paint. The original exterior latex paint held up pretty well, so I decided to go that route again. It's also cheap! I repainted the boat with two quarts of Valspar Duramax. I wanted to do a two-tone paint scheme but keep the Rise's original yellow heritage. I gave myself 15 minutes for paint color selection and finally went with a desaturated blue-gray on the sides and bottom and yellow on top, somewhat but not quite navy blue and gold colors. The actual color names (for next time) are Smoky Pitch and Sunspark. The first coat of yellow got mixed with Marinepoxy non-skid additive from Duckworks to give us better grip on the deck, and the second coat was done plain to seal it out. I still haven't seen it in the daytime, but I think it looks at least a little more interesting.


We also built some hiking benches which will get the job done during the race. Thanks to Gary Dierking (the Wa'apa's designer) for the reminder. Now I just need to reattach all the rigging on the deck, pack up, and head out. See you on the starting line!

Sunday, September 25, 2011

Semifinal touches

Here's a quick photo update of progress during the last week. After the big boat bash overhaul last weekend we've been putting final touches on the rigging here and there. First we reglassed the boom jaw and gave the whole thing a coat of spar varnish. We molded a ring on the mast for the boom to ride on when furling (you have to temporarily unclip the boom from the tack of the sail to allow it to roll around the mast, leaving the boom unsupported in the front).

We added some crucially needed instruments: a marine compass and a windvane mounted on the bow. The leeboard got its quick-n-dirty mounting hole drilled out and molded an epoxy sleeve around the pivot bolt. That will prevent water from getting into the board and help transfer bearing loads from the pivot.
 The trailer got new carpeted bunks so the boat doesn't get torn up when launching and retrieving - now it looks like a real boat trailer!


Still no paint yet (that will probably happen tomorrow). Hope to go out for a test sail this afternoon. There's still a lot to buy and pack for the NCC and barely enough time!


Finally, thanks again to Dan and Mary for hosting The Rise in their garage this past week - it's really made it possible to get all this work done.

Tuesday, September 20, 2011

Boat Bash Photos

These are from Tim - thanks!
"Quadmaran" configuration with Tim's canoe


Monday, September 19, 2011

Boat Bash - A Sleeker Overall Look p2


On Sunday, we were back at it early. First we applied a new glass tape edge to the bottom of the hull to give it a little more abrasion resistance and repair a few scratches / gouges that had worn through the original glass layer. We also replaced all the shock cord on the deck, installed the leeboard, and finally, WENT SAILING!


The Rise, finally ready to (re)Launch
We went to Washington Sailing Marina in Alexandria and assembled the boat on the trailer before launching on a normal boat ramp. We got a lot of strange looks at the marina. It seemed that no one understood this was a sailboat and a canoe (and therefore could be easily paddled backwards away from the slip). A lot of helpful people offered their advice, some of which we took, and most of which we ignored. Trent and Dan were The Rise crew for our first voyage. Tim and JB headed to a different park to launch Tim's canoe (you can only launch sailboats at WSM - a huge pain!). We unrolled the sail as soon as we left the dock and sailed out into the Potomac, turning north to head towards Gravelly Point Park and meet the other guys. The new leeboard worked well, although we jury-rigged a bungee to hold it vertical - maybe the bolt tension wasn't high enough. We took on a little bit of water, which was initially alarming. After a while we realized that the control line sleeves were underwater because we had Dan in the back hatch, so water was being pumped into the main compartment. We'll re-rig these to put an upside down U in the lines to keep water out, and re-seal the tubes where they exit the hull.

The boat sailed nicely on one long upwind tack around Reagan National Airport while the big jets landed and took off right overhead. Trent got a real cockpit and seat, but Dan had to sit in the aft hatch. Later he moved up to the front hatch which was a little roomier... The boat sailed nicely, averaging about 3.5 to 4 kts on our first leg. We met the guys as they paddled out of Gravelly Point, where they successfully docked 'under our wing' and we continued sailing north towards Georgetown. The ride was fun especially because the interaction between the two canoe hulls would cause small waves to fountain into the boats. It started to get late, so we turned back and dropped Tim and JB at their put-in before sailing down to the marina, slowing down a little as the winds calmed. We picked up the paddles to make sure we would get back before dark. One last puff brought the boat right into the dock. All in all, it was a great (re)Launch and bodes well for the NCC!

Trent got the front cockpit
Dan rode in the back hatch - not the best accommodations...
It was good to be back on the water!

Tim and JB launched from Gravelly Point Park in a canoe...
And docked (backwards!) with the Rise (between the main hull and ama) to make a very strange quadmaran

The launch crew - thanks for all the help, guys!


Boat Bash - A Sleeker Overall Look p1

With the NCC coming, I've started to turn up the heat on boat and race prep. Fortunately I have a lot of great friends / coworkers who also enjoy a challenging project and also happened to have free time this weekend (or no ready excuses when asked about their plans). Thanks go out to Dan, Trent, JB, Tim, and Christine - but mainly I owe thanks to Dan and Mary for hosting The Rise in their garage for the 1.5 weeks left until the race! The Rise barely fits on the diagonal!


We started early Saturday with a big todo list. First was an overall inspection of the boat structures, including opening up the fore and aft 'watertight' bulkheads. We immediately found one big problem spot at the stern - the plywood deck was soggy where it met the oak transom. There was only one thing to do, and that was cut it off. After the top came off, it became clear that the damage had spread a little ways down the side as well. After a little strategizing we decided to cut out a triangular shape which would cut out all the damaged wood, and simply cap the stern with a slanted plywood piece. Although it's a different shape than the original, it was the easiest way to get the boat back on the water (and the stern shape isn't really critical, anyway. Trent planed the cut area flat, cut new gunwales, and installed a plywood cap. Temporary screws clamped the repair in place while it cured.


Meanwhile, work continued on the rest of the boat. Tim sanded the leeboard while JB, Christine, and Dan worked their way down the whole hull applying new epoxy fillets and glass tape along the chines from end to end.


Other repairs included rebuilding one set of seat mount plates which had warped over time, removal and reinstallation of the rudder footpedal tracks (this time bonding a wooden block to the hull first, then reinstalling the footpedals), and re-rigging of the rudder up-haul / down-haul system (which had to be removed from its old spot when we cut off the back of the boat). We also added some wooden 'bunks' to the trailer which will get a layer of soft carpet to keep the boat from getting gouged on the trailer frame.

Day quickly became night and we called it quits for the night. There was always tomorrow...


Leeboard layup

Fast forward a couple weeks - I have really been slacking off on posting but only because I've been working harder at getting things done, I promise! After finishing the leeboard blank at Trent's place, I brought the board home to shape the final contour and seal the board out with a layer of glass.

I started by laying out the handle and rounded tip using a ruler and a compass. The tip is just a semicircle of slightly larger diameter than the width of the board. The handle was a little more complicated. I decided to only roughly center it on the board but try to keep two full board widths from the original layup - the joint lines made an actually centered shape looked sorta out of kilter. The handle shape and contour are formed from intersecting circular segments.

Roughed tip shape

Once the layout was complete I rough cut the shapes with a jigsaw. Final contouring took a couple hours with a block plane and sandpaper. For the interior curves I wished I had a spokeshave or a spindle sander. Once contouring was complete the board got a good final sanding and a layer of 6oz glass on both sides.

Leeboard layup in progress
The layup went pretty smoothly despite threatening thunderstorms and the distractions of NFL games. I left the board to cure outside overnight and it got an early waterproofing check, fortunately it is built for that! This last weekend we had  fun boat overhaul bash. Tim sanded the glass down and gave it a coat of spar varnish. After the varnish went on it was clear that this is the best built component on the boat!  
Tim sands the leeboard. You can't tell, but he is smiling.

The leeboard, installed on The Rise

Sunday, September 4, 2011

Building a better leeboard (p3)

After jointing, ripping, and laminating the raw cedar lumber into a composite blank, it was finally time for the fun part - turning it into a foil. I planned to do this by hand and was expecting to a long and 'character building' process involving toiling into the night every day for a week. Fortunately, I was wrong and we were able to pull it off in one afternoon. Here's how we did it:

First we trimmed down the oversize blank, picking the part which was the most flat. Then we used hand planes (a scrub plane and a jack plane) to rough down the high spots, remove all the epoxy blobs on the surface, and make one face of the blank completely flat. Surprisingly, this only took about a half hour. Trent sharpens his planes using the 'scary sharp' method (sandpaper on glass) which I'm sure had a little bit to do with our success. 
Next we picked the end of the blank we wanted to be the leading edge, and planed it flat relative to the joint lines between the sticks. This allowed us to use the flat front face as a reference to align and glue paper airfoil templates on the ends of the blank. After measuring the size of our roughly finished board, we decided to go with a NACA 0011 (we lost a little too much material for 12% thickness).
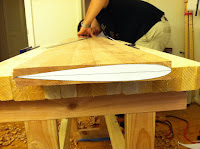
With the templates in place we then went to work fairing down to match the airfoil profile. This was much easier at the leading edge since you could quickly see the material being removed. The trailing edge required a lot more wood removal and a lot more 'character building' but wasn't so bad. After finishing the top surface we flipped the board over, using a couple 1x4's as shim blocks to allow us to clamp the board in place. This was tricky since the board got more flexible as we removed material; too much clamping could warp the board and cause us to take off too much material at the center of the board. Despite it being a little trickier, we also knew (a little better) what we were doing so it went faster the second time around. After another hour and a half we had a big wooden airfoil.
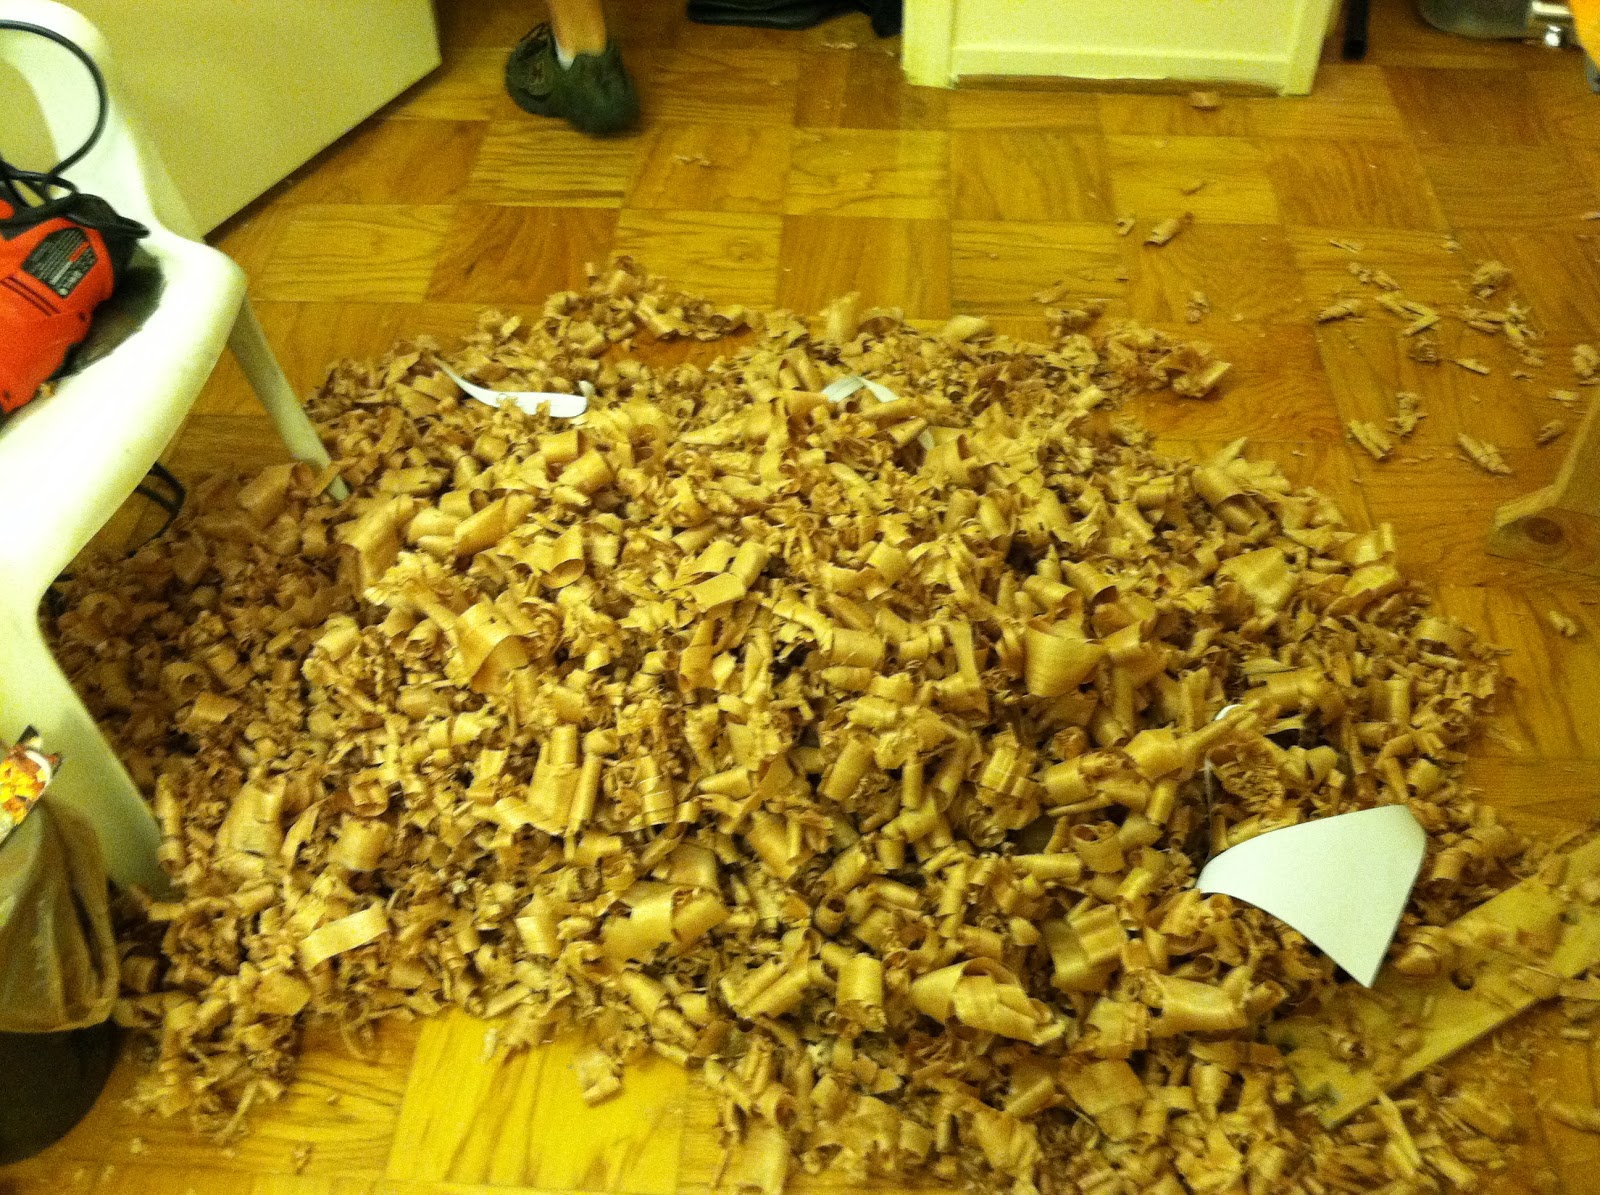
 As evidence of our hard work I took this photo of the shavings produced in one afternoon. Looks like a home for a really big hamster.

The next step is to cut the board into the desired final shape (with a rounded tip and contoured handle, of course), seal out the board with a layer of 9oz fiberglass, and build in an epoxy sleeve which will accept the pivot bolt from the hull. The easy part, in other words. Hopefully more photos and notes to post shortly!

Building a better leeboard (p2)

I haven't posted in a while, but work on a new leeboard for 'The Rise' has been continuing in the background. When I posted last, the 'board was still a raw piece of Spanish Cedar lumber. Turning it into a functional piece of marine hardware has been a learning process so far (and I'm still not quite done). Trent and I stayed late a couple days at work to get through the first few steps which required power tools. Unfortunately that means I don't have any pictures to post of the process.
To make a long story short, we:

  1. Cut the raw lumber into two pieces the length of the finished board plus extra to trim later
  2. Flattened two adjacent sides of each board (one side, one face) using a jointer.
  3. Ripped each board on a table saw to the desired max thickness of the foil. We got three sticks out of each board, all of which were about 1+3/8" by 1+7/8". 
  4. Carefully ripped down the last face on the sticks to ensure it was perpendicular to the rest.
  5. Stacked together the six sticks would make a single laminated blank (imagine a wooden cutting board or workbench) about 1+3/8" by 11+1/4," perfect for a 12% thick airfoil. We swapped every other stick end for end so the finished blank would resist twisting and cupping, and selected the final position of each stick.
  6. Ripped the outer sticks (which would form the leading edge (LE) and trailing edge (TE)) in half.
  7. Laid up two layers of glass tape and Marinepoxy between the top and bottom of the LE and TE sticks to establish a precise centerline and (for the TE at least) give it some internal structure that would allow us to precisely shape the sharp trailing edge. 
  8. Glued together the whole stack using Marinepoxy and wood flour filler. Trent and I hadn't used wood flour before but it was pleasant to work with and didn't scream 'carcinogen' like cabosil filler does. The filled epoxy looked like caramel sauce but was about a mayonnaise consistency. The thickened epoxy was really helpful to keep it from running all over the place while assembling the stack. We built the stack vertically (so the epoxy joints were horizontal), buttering up both sides of every joint before adding each new stick to the pile. It took about eight clamps to hold the stack tight overnight.
When we finished step 8 we had a solid roughly rectangular blank of wood which would eventually become a foil. More info (and pictures) to follow in the next post.

As a parting note, Duckworks Boat Builders Supply sponsored Team RAF in our Everglades Challenge entry in 2007 with Marinepoxy resin and other supplies. They have great deals on all kinds of boat building supplies. All the supplies used in this build came from their Basic Small Boat Epoxy Kit